


If you're replacing your original AT&T-3G-equipped iPad (and its active data plan) with a newly purchased AT&T 3G iPad 2, you may be wondering if you'll be able to transfer your data plan from the old iPad to the new one. I contacted AT&T's customer support department to do just that, and the representative's first inclination was to go through the (tedious) process of modifying my account information to associate the new iPad with the existing data plan.
However, as our friends at Cult of Mac first pointed out, there's an easier way: Just swap the SIM cards.
The SIM—short for Subscriber Identity Module—card is a small, plastic card with a bit of circuitry that stores a unique identification code called an International Mobile Subscriber Identity (IMSI).GSM mobile networks, such as AT&T in the U.S., use SIM cards to uniquely associate a particular mobile device—in this case, your iPad—with a particular wireless account. Specifically, AT&T uses a newer, and tinier, version of a SIM card called a Micro-SIM.
But a SIM card isn't itself tied to a particular phone or tablet—it can be moved freely between devices, which is why you're able to take an unlocked U.S. GSM phone to Europe and use a European-network SIM card with the phone.
The upshot here is that if you remove the SIM card from your original iPad and then place it in your iPad 2, your 3G data plan is transferred as well. The procedure worked perfectly in my testing. Here are the simple steps involved:
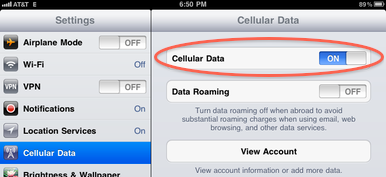
Step 1: Disable cellular data
On your original 3G-equipped iPad, open the Settings app, tap Cellular Data, and then turn off the Cellular Data option. This disables 3G data use before you make the SIM-card swap.
Step 2: Turn off both iPads
You should always turn off your iPad—not just put it to sleep—when removing or inserting a SIM card, so you should turn off both your old and new iPads. On each device, just hold down the Sleep/Wake button until the Slide To Power Off slider appears on the screen; swipe the slider to the right to turn off the iPad.
Step 3: Remove the SIM cards
The Micro-SIM card sits snuggly in a tiny tray that slides into the iPad’s left-hand edge. On the original iPad, this tray is located about a third of the way from the bottom of the tablet; on the iPad 2, the tray is near the top. You can eject each tray using either the official SIM-removal tool included with your iPad or a straightened paper clip—just insert the tool into the tiny hole and give it a firm push, and the tray will slide out.
Once you remove the tray, the Micro-SIM card can fall out of the tray easily, so be sure to keep track of which Micro-SIM came from which iPad.
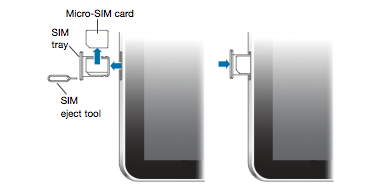
The original iPad's SIM-card tray
Step 4: Swap the SIM cards
This is the easy part: Plop the Micro-SIM card from your original iPad into the iPad 2’s SIM-card tray, and drop the card from your iPad 2 into the tray for your original iPad. If the cards are properly seated, the trays should slide easily into their respective iPads—give each a gentle push until the tray is flush with the edge of the iPad.
Step 5: Turn on, log on
Turn on your new iPad 2 by holding down the Sleep/Wake button until the Apple logo appears on the screen. Once the iPad is up and running, open the Settings app, tap Cellular Data, and then turn on the Cellular Data option.
You should be good to go. However, there’s a chance that instead of starting up normally, the iPad 2 will display the Connect To iTunes screen. If so, simply connect the iPad to your computer using Apple’s USB dock-connector cable and launch iTunes; this should reactivate the iPad with the new SIM.
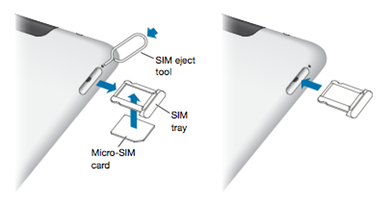
The iPad 2's SIM-card tray
It’s official!
Despite my initial conversation with AT&T customer support, the SIM-card-swap now appears to be the company’s official procedure. On a follow-up call, I was able to talk directly with a representative from AT&T’s Data Tech Support department, who told me that as long as you no longer need 3G service on your original iPad, swapping the SIM cards is the easiest and most effective way to migrate your plan. (The company would still prefer, however, that you call in so it can update your account with your new iPad’s IMEI number.) Indeed, Apple has just published a support article describing the same procedure.
The Verizon version
It’s unlikely you’re already migrating from one Verizon-3G-equipped iPad to another, given that there was no Verizon-3G version of the original iPad. But such migrations will happen soon enough, so: What if you’ve got a Verizon-3G-equipped iPad 2 and you want to transfer its data plan to a different Verizon iPad 2? iPads made for Verizon's U.S. network use CDMA technology, rather than GSM, which means they don’t have a SIM card to swap. As the aforementioned Apple support document explains, to migrate a Verizon data plan, you’ll need to contact Verizon (by calling 800-786-8149) and ask to transfer service from one iPad to another. Once the virtual paperwork is complete, you must open the Settings app, tap General, tap Reset, tap Reset Subscriber Service, and, finally, tap Reprovision Account. Apple says that if your data plan isn’t active on the new iPad within two minutes, restarting the iPad should give it the kick it needs.
No comments:
Post a Comment